Personnel Import Old
Import Personnel Screen
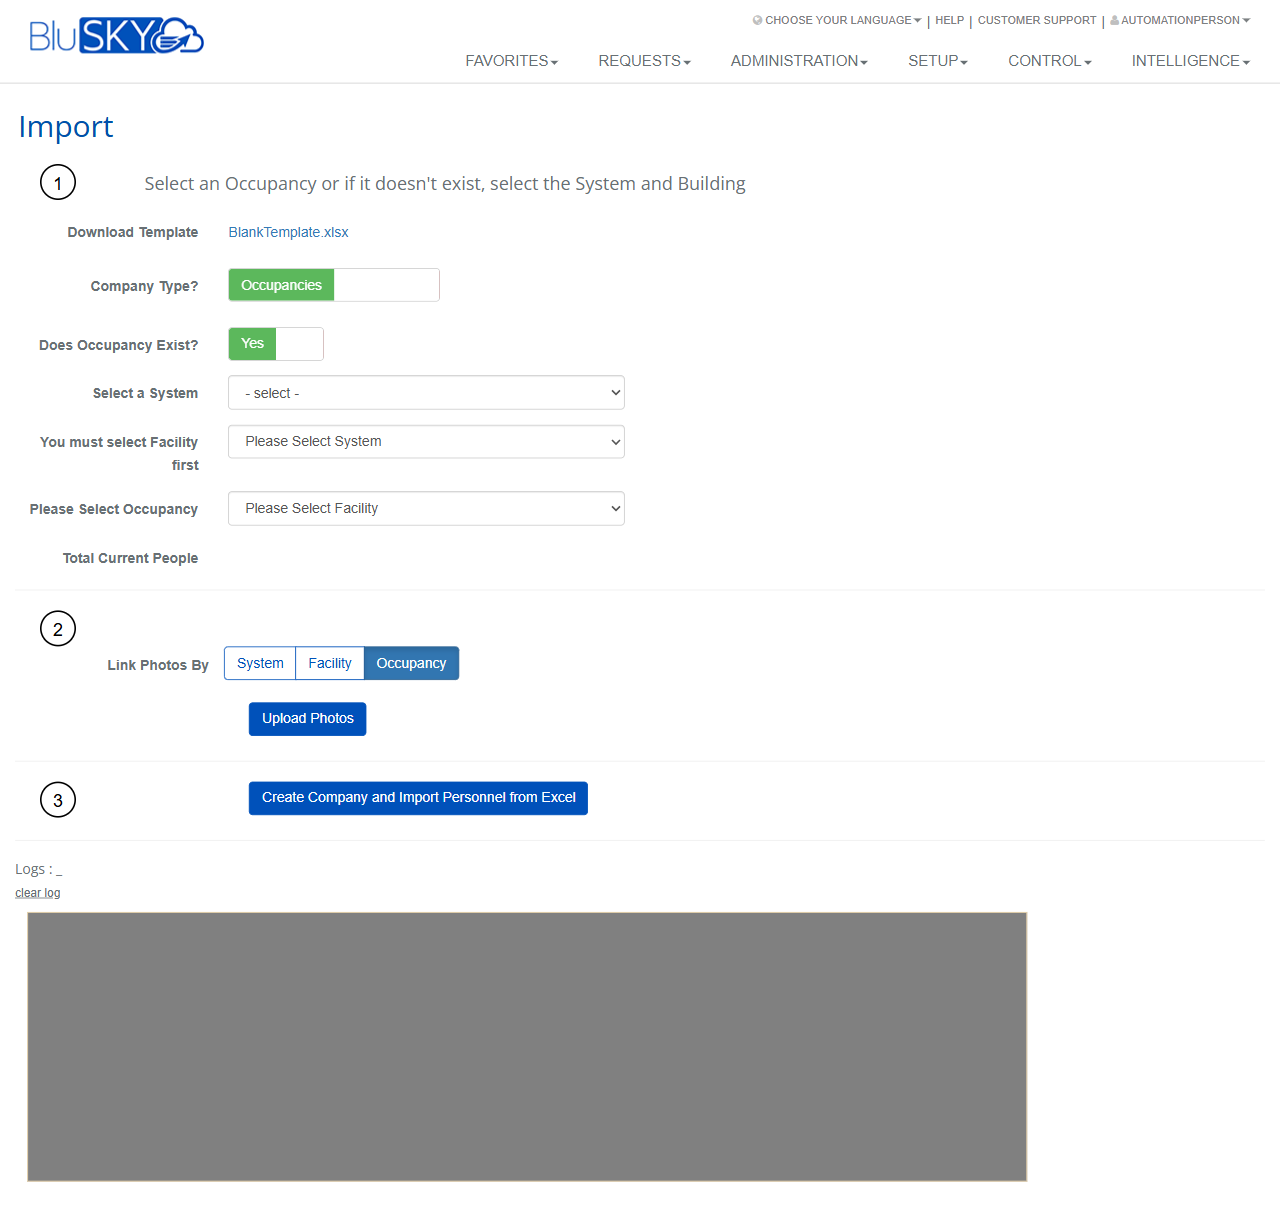
Screen Overview
The Import screen enables administrators to bulk-create and update people by uploading a standardized Excel template, optionally creating the associated company/occupancy during the process, and linking profile photos. The page guides you through three steps: select scope (system, facility, occupancy), optionally upload photos, and run the import.
Field Definitions
| Field Label | Definition | Notes |
|---|---|---|
| Download Template | Provides a downloadable Excel file used to prepare personnel records for import. | File type: .xlsx. Use the provided template only to avoid validation errors. |
| Company Type? | Defines the type of company record that will be created/used for the import. | Shown as “Occupancies” in the screen; determines where people will be placed. |
| Does Occupancy Exist? | Indicates whether the target occupancy already exists. | Set to Yes to import into an existing occupancy; set to No to create the occupancy during import. |
| Select a System | Chooses the BluSKY system context for the import. | Required. Must be selected before Facility becomes available. |
| Select Facility | Chooses the facility/building within the selected system. | Required. Enabled only after a System is selected. |
| Select Occupancy | Chooses the occupancy (company) within the selected facility. | Required when “Does Occupancy Exist?” = Yes. |
| Total Current People | Displays the number of existing people in the selected occupancy. | Read-only; updates after an occupancy is selected. |
| Link Photos By | Determines the organizational scope used when associating uploaded photos to people. Options: System, Facility, Occupancy. | Selection controls how photos are resolved and stored. Does not start an upload by itself. |
| Logs | Shows detailed progress and results of photo upload and Excel import operations. | Read-only. Includes errors, warnings, and row-level results. |
Screen Actions and Functions
- Upload Photos – Opens a file chooser to upload image files for the selected scope.
- Create Company and Import Personnel from Excel – Runs the import using the selected scope and the prepared Excel file; creates the company/occupancy if needed.
- clear log – Clears the contents of the Logs panel for a fresh run.
- Scope selectors (System, Facility, Occupancy) – Change the target location for the import and for photo linking.
- Download Template – Downloads the blank Excel template.
Usage Instructions & Examples
How to Import People into an Existing Occupancy
- Click Download Template and populate the spreadsheet with personnel data.
- Set Does Occupancy Exist? to Yes.
- Select a System, then select the appropriate Facility.
- Select the target Occupancy. Confirm Total Current People for context.
- Click Create Company and Import Personnel from Excel and select your completed template.
- Review the Logs panel for successes, warnings, or errors. Correct issues and re-run if necessary.
How to Create a New Occupancy and Import People
- Click Download Template and prepare your personnel data.
- Set Does Occupancy Exist? to No.
- Select a System, then select the Facility where the new occupancy should be created.
- Click Create Company and Import Personnel from Excel and choose the template.
- Verify in Logs that the company/occupancy was created and people were imported.
How to Upload and Link Photos
- Choose Link Photos By: System, Facility, or Occupancy to define the scope.
- Click Upload Photos and select image files.
- Monitor the Logs panel for upload status and any unmatched photos.
System Behaviors and Edge Cases
- Facility is disabled until a System is selected; Occupancy is disabled until a Facility is selected.
- When Does Occupancy Exist? = No, the system attempts to create the occupancy during the import step.
- Total Current People updates only after an occupancy is chosen; it remains blank otherwise.
- The import expects the structure of the provided template; additional/renamed columns or hidden sheets may cause validation errors.
- The Logs panel records row numbers and messages for each processed record and photo; always review it after a run.
- Very large files or photo batches may process for several minutes; the UI remains responsive while logs stream results.
- If duplicate or conflicting person data is detected, the system flags the affected rows in Logs; outcomes (update vs. skip) depend on environment configuration and matching rules.
- Photo linking applies within the selected scope; changing scope before upload changes where photos are associated.
- Using clear log removes on-screen history only; it does not undo completed imports.
Permissions
- Screen access typically restricted to Global Administrators, Tenant/Facility Administrators, or users granted Import People permissions.
- Ability to create companies/occupancies may require elevated administrative rights.
- Photo upload may be limited to users with media or identity management permissions.
Linked Workflows
- After import, assign Access Levels or credentials to the new people.
- Use People management screens to edit records, send invitations, or deactivate users.
- Optional badge printing or photo review workflows can follow successful import.
- Audit and reporting can be performed under Intelligence once data is imported.
Reference Image Links