Portals
Portal List Screen
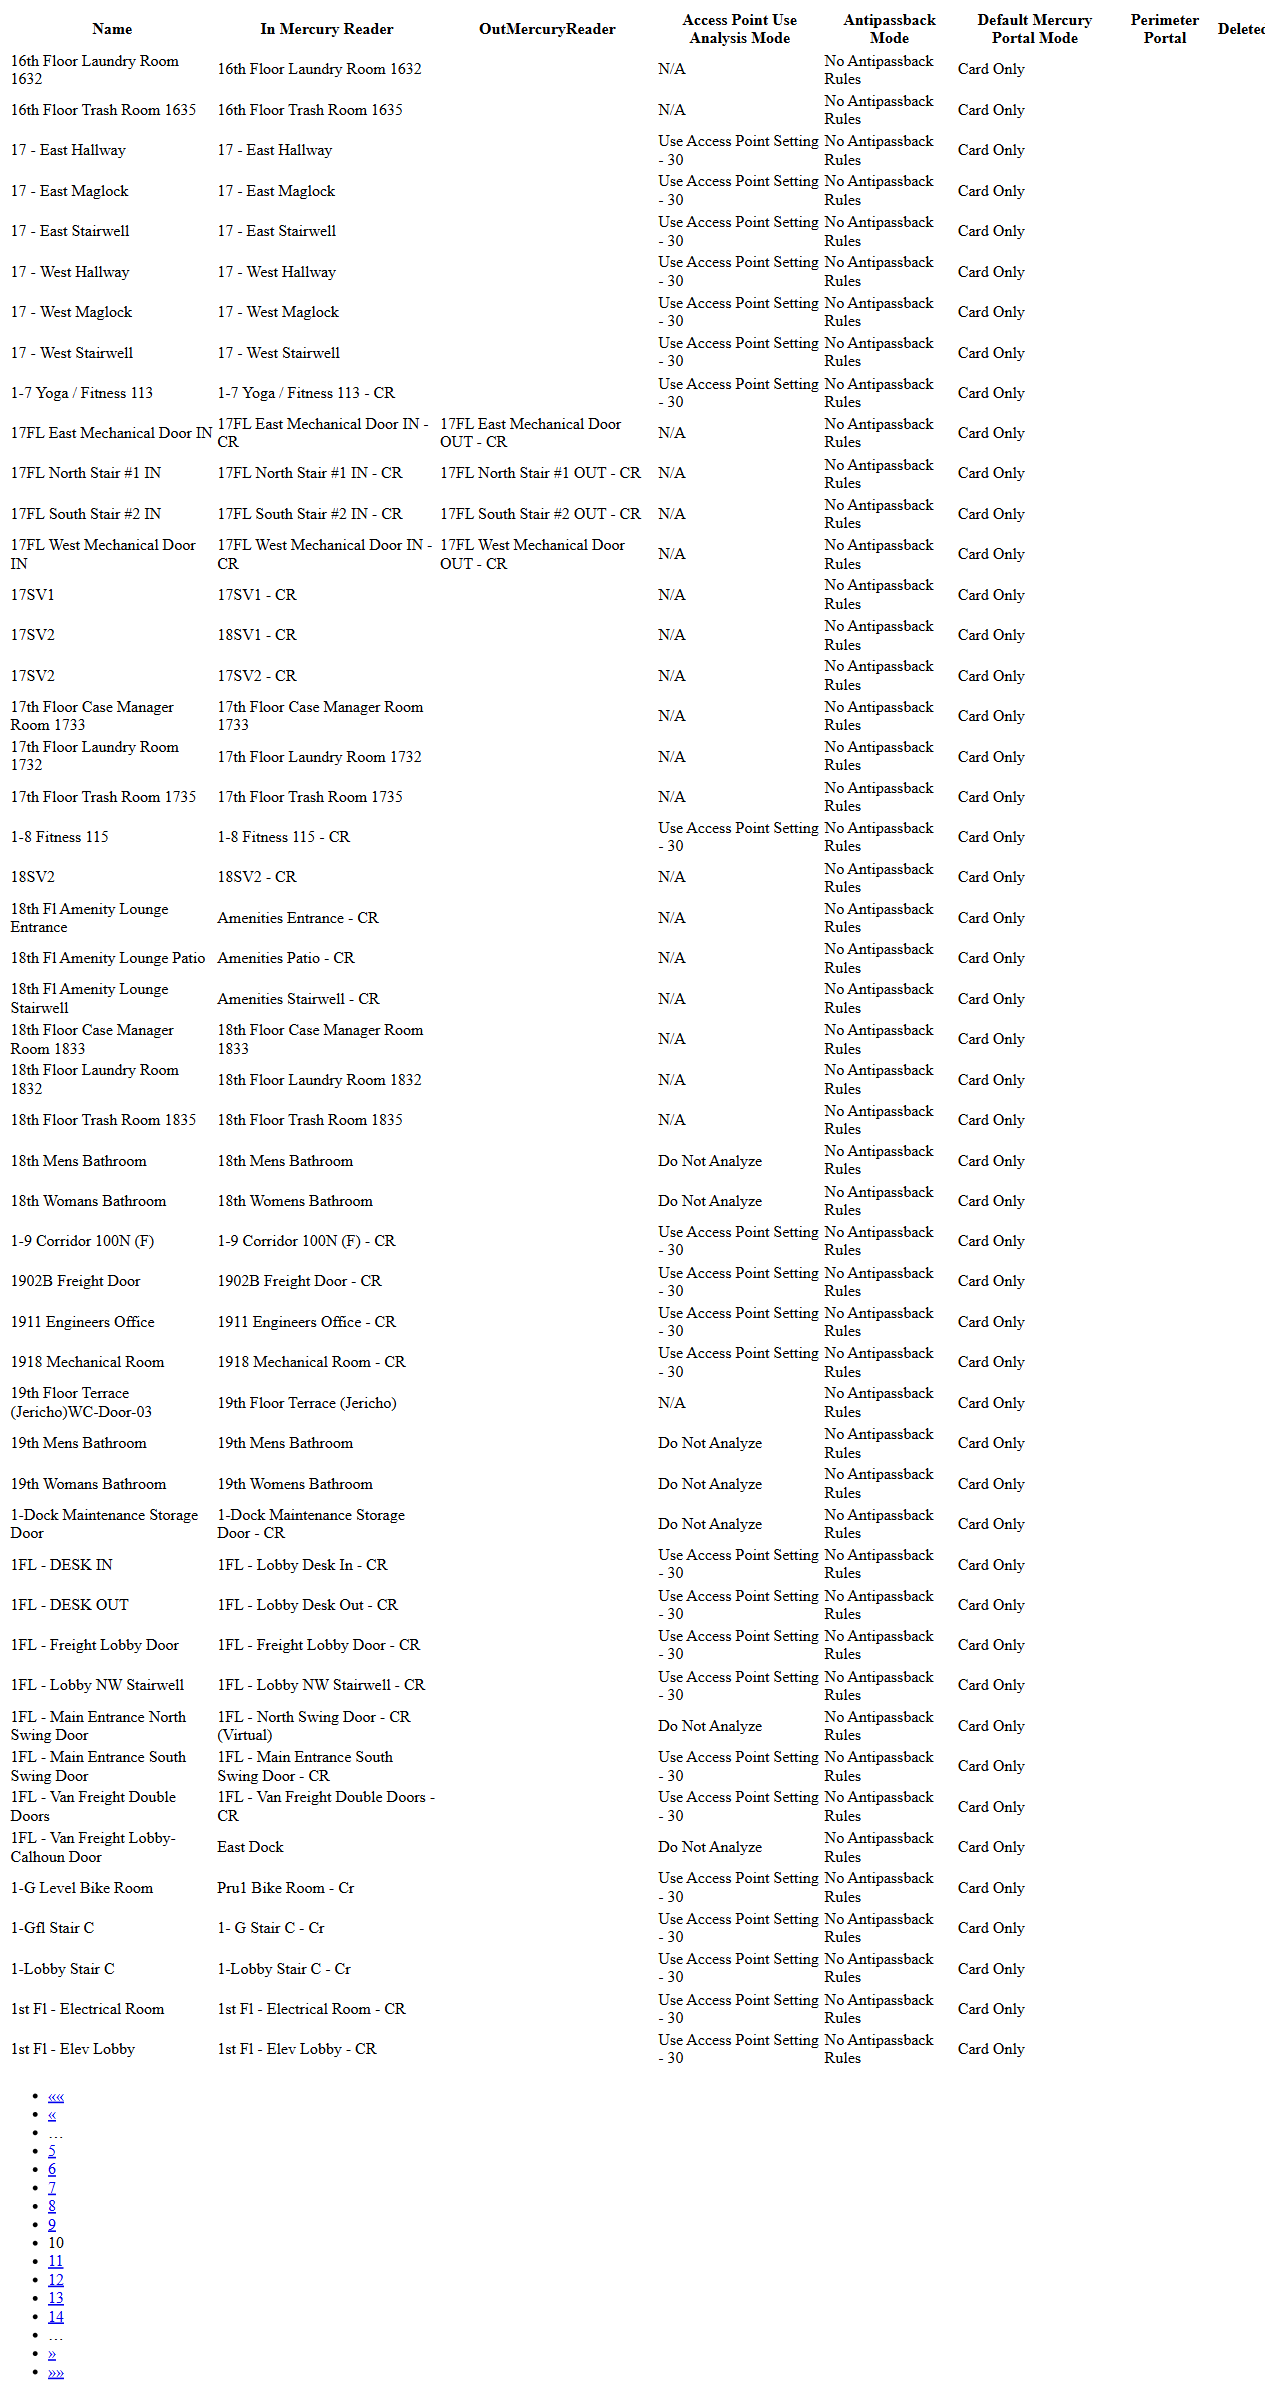
Screen Overview
The Portal List screen provides a searchable, filterable list of all portals (doors) configured in BluSKY. It shows each portal’s reader assignments, analysis and antipassback settings, and default Mercury portal mode. From this screen, authorized users can create new portals, view or edit existing ones, delete records, and switch to an expanded grid for easier review.
Field Definitions
| Field Label | Definition | Notes |
|---|---|---|
| System | Dropdown used to filter portals by system/site. | Optional. Selecting a system narrows the Controller list. |
| Controller | Dropdown to filter portals by a specific controller within the chosen system. | Optional. Disabled until a System is selected (in most deployments). |
| Search Text | Text box to search by portal name (contains match). | Press Submit to apply. |
| View | Status filter for the result set (e.g., All Active). | Other views may include All or Deleted, depending on permissions. |
| Portal Count | Displays the total number of portals returned by the current filters. | Read-only. Updates after Submit. |
| Name | The display name of the portal (door). | Click a row to select it for actions. |
| In Mercury Reader | The “IN” reader associated with the portal in the Mercury controller. | May be blank if the portal is exit-only or not yet assigned. |
| OutMercuryReader | The “OUT” reader associated with the portal in the Mercury controller. | May be N/A for single-reader portals. |
| Access Point Use Analysis Mode | Determines how events on this portal are analyzed (e.g., Use Access Point Setting - 30, Do Not Analyze, N/A). | “Use Access Point Setting” inherits the analysis configured on the access point. |
| Antipassback Mode | Antipassback rule applied to the portal. | “No Antipassback Rules” indicates antipassback is disabled for this portal. |
| Default Mercury Portal Mode | The default operating mode for the door in Mercury (e.g., Card Only). | Actual available modes depend on hardware capability and site policy. |
| Perimeter Portal | Indicates whether the portal is designated as part of the site perimeter. | Used by perimeter and lockdown features. |
| Deleted | Shows whether the record is soft-deleted. | Deleted portals do not appear in “All Active” view. |
| Pagination | Page selector at the bottom of the grid to navigate through results. | Page size typically limited (e.g., 50 rows per page). |
| Selected Count | Indicator showing how many rows are currently selected (e.g., 1/50 selected). | Appears when at least one row is selected. |
Screen Actions and Functions
- Submit – Applies the current filters and refreshes the list.
- Reset – Clears all filters and restores default view.
- Create – Opens the new Portal form to add a portal.
- View – Opens a read-only view of the selected portal.
- Edit – Opens the edit form for the selected portal.
- Delete – Soft-deletes the selected portal(s); flags the record as Deleted.
- Expand – Toggles an expanded, wide grid for easier scanning of many columns.
Usage Instructions & Examples
How to find a portal by name
- In Search Text, enter part of the portal name.
- Optionally choose System and Controller to narrow results.
- Set View to All Active.
- Click Submit and review the matching rows.
How to inspect a portal’s configuration
- Click a row to select the portal.
- Click View to open the read-only details.
- Review reader assignments, analysis mode, antipassback, and default portal mode.
How to create a new portal
- Click Create.
- Enter a unique Name.
- Assign In Mercury Reader and, if applicable, OutMercuryReader.
- Choose Access Point Use Analysis Mode and Antipassback Mode as required.
- Set Default Mercury Portal Mode (e.g., Card Only).
- If needed, mark the portal as a Perimeter Portal.
- Save. The new portal appears in the list after the page refreshes.
How to edit an existing portal
- Select the desired portal row.
- Click Edit.
- Update reader assignments or modes as needed.
- Save. Confirm changes in the grid.
How to delete a portal
- Select one or more portals.
- Click Delete and confirm.
- The records will be flagged as Deleted and will no longer appear in All Active view.
How to review more columns comfortably
- Click Expand to switch to the expanded grid.
- Use the horizontal scrollbar to see additional columns.
- Click Expand again to return to the standard view.
System Behaviors and Edge Cases
- Filters are not applied until Submit is clicked; Portal Count updates after each submission.
- Reset returns filters to defaults and navigates to the first page of results.
- Selection is cleared when filters are changed or pagination moves to another page.
- When OutMercuryReader is N/A, the portal uses a single reader or does not have an “OUT” side configured.
- Access Point Use Analysis Mode set to “Use Access Point Setting” inherits from the linked access point; “Do Not Analyze” bypasses analysis for that portal.
- Delete is a soft-delete; the record remains for audit and can be viewed when the View filter includes Deleted (permissions required).
- Large datasets are paginated; only the current page (e.g., up to 50 records) can be selected at once.
- Some columns may be hidden in smaller viewports; use horizontal scrolling or Expand to reveal them.
Permissions
- Access to the Portal List is typically granted to Global Administrators, Integrators/Installers, and Tenant Administrators with setup/manage-door permissions.
- Create and Edit require the Manage Portals permission (or equivalent).
- Delete requires the Delete Portals permission and may be restricted to high-privilege roles.
- Users with view-only rights can search and view details but cannot modify or delete records.
Linked Workflows
- Configure or change reader hardware under Readers and Controllers.
- Adjust analysis behavior at the Access Point level when Access Point Use Analysis Mode is set to “Use Access Point Setting.”
- Define or modify Antipassback rules under Antipassback configuration.
- Assign door modes and schedules under Door/Portal Modes and Schedules.
- Include or remove a door from security lockdown by managing Perimeter settings.
- After creating or editing a portal, assign it to Access Levels so people can use the door.
Reference Image Links